Page 1 of 1
Lampshade modelling and materials
Posted: Tue Dec 14, 2010 6:12 pm
by nik_h
Hi all,
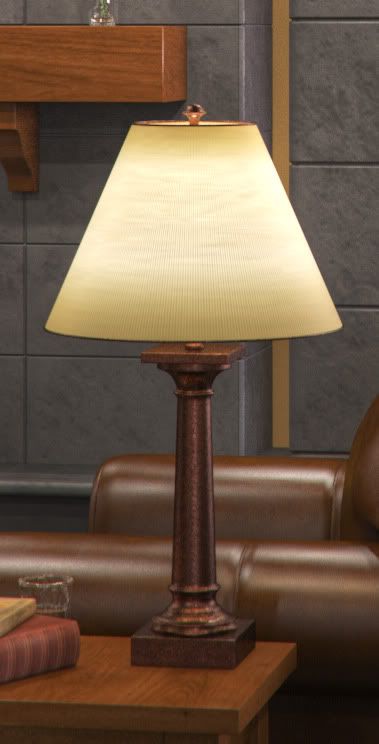
I've just got hold of Maxwell 2.5 (previously on v1) and I am trying to get to grips with SSS. I'm particularly intrigued by thin SSS as a way of creating a realistic lampshade material. See the image below:

Here the shade comprises two thin layers of different materials bonded together. The outer finish is a finely textured fabric and the inner surface is smooth white coated paper (or possibly PVC).
How should I model the shade - as two separate surfaces or as a single surface with no thickness? Then how should I assign materials and SSS so that the lampshade "glows" as it should?
This is all new territory for me so any pointers would be fantastic. Does anyone have any example renders and/or material settings that they have used in the past?
Cheers,
Nik
Re: Lampshade modelling and materials
Posted: Wed Dec 15, 2010 12:17 am
by Bubbaloo
The easiest and quickest way: make an hdr based emitter material for the shade.
Here's an example of one I did recently:
Re: Lampshade modelling and materials
Posted: Wed Dec 15, 2010 12:39 am
by brodie_geers
I tried that once without such nice results. Care to share a .jpg of the .hdr that you used for that? I'm not sure if I just didn't get the color quite right or what. Is that basically just a horizontal gradient?
-Brodie
Re: Lampshade modelling and materials
Posted: Wed Dec 15, 2010 11:51 am
by nik_h
Hi Bubbabloo, that looks great. I imagine you could model another layer on the inside to give it a different finish and then use a spherical emitter inside to get the light cones projecting up and down. The FormZ plugin has some issues at the moment, but once it is back up and running I'll try some variations and post the results. Still interested in a SSS solution too.
Cheers,
Nik
Re: Lampshade modelling and materials
Posted: Wed Dec 15, 2010 1:12 pm
by Mihai
Thinsss will work very well for this, you can just model a single sided surface. Some examples and material settings:
Scene also has two emitters to illuminate the lampshade a bit.

Material:

The asymetry will allow you to control how diffused or focused the light is that's coming from the other side. Negative asymmetry will let most light pass through without scattering back towards the inside of the lamp shade (towards the direction of the incoming light), giving you a more clear transparent look. With positive asymmetry you'll get less light pass through the lamp shade (it will instead scatter back towards the light bulb) but also diffuse the light more. So if you want a more diffused look set asymmetry to something around 0 and also you could decrease the thinSSS thickness and/or increase the transmittance distance to compensate for less light going through the lamp shade. Here I also used a canvas cloth texture for refl/trans/sca colors. It's not necessary though to use a texture for tran/sca, but could give a bit more variation in the look.
Here with asymmetry to -0.1 (instead of -0.5) and thickness 0.3mm (instead of 0.5mm):

Re: Lampshade modelling and materials
Posted: Wed Dec 15, 2010 1:25 pm
by zdeno

sss
Re: Lampshade modelling and materials
Posted: Wed Dec 15, 2010 1:53 pm
by nik_h
Mihai - Perfect! Thanks for explanation, the asymmetry settings are very interesting, something I didn't know about. Did you model the shade with thickness or is it a surface with zero thickness? Also, if I added another surface to the inside of the shade with a white finish and the same SSS settings would the lampshade effect still work? I'll try it out once MaxwellZ is working again.
Zdeno - Looks great. Are you using the same method as Mihai?
Re: Lampshade modelling and materials
Posted: Wed Dec 15, 2010 4:23 pm
by Mihai
That was a single sided surface. Thinsss can work also with a volume (as long as it's not too thick, it starts looking weird), you can try adding two thinsss materials, one for inside, one for outside. I think it should work ok.
Re: Lampshade modelling and materials
Posted: Wed Dec 15, 2010 6:13 pm
by Richard
VERY Nice test there Mihai!!
And thanks for the clear explanation!