Page 1 of 2

More on "homemade" HDRI's

Posted: Wed Aug 09, 2006 5:31 pm
by Jake256
Another thread http://www.maxwellrender.com/forum/view ... hp?t=17975 about HDRIs and the availability of high-quality versions came up, so I thought I'd start a new thread on the subject.

A forum member was looking for good, high quality clear sky HDRI's – something without buildings or other distractions. I suggested he go to http://www.1000skies.com/fullpanos/index.htm and buy a few of the high-rez panos and convert them to 32-bit radiance files in photoshop. While not TRUE HDRI's, they work pretty well if you want to get rid of the "Maxwell Sky" look. Adjusting gamma and exposure with PhotoshopCS2 will give you results you need in most cases.

The samples I am posting are relatively low-rez due to the limits of renderer they were originally used for. I have not gone back and made the high-rez versions yet.

Anyway here is a sampling of renders using the 1000 Skies panos ad HDRI's. The images aren't great, but they will give you an idea of how the 1000 skies panos can be used.


The first was done in Cheetah, which has size limitations for HDRI's.
Image

The second was done in Modo. The sky is a little compressed as I have not quite figured out the mapping settings yet.
Image

The third and forth are Maxwell renders that I ran off this morning. They work quite well and if used at a higher-rez and left to run for 6-7 hours would be fine for most applications. Notice the nice horizon line with the trees.

Image

Image


The last is another Cheetah render using an HDRI of a full-screen VR that photographed in Chicago. This again used the same PhotoshopCS conversion technique.

Image

This technique will only work in Photoshop CS2 which supports 32-bit radiance files. If the HDRI will not be seen in the final image and is only used to light the model then anyone with CS2 can make a file using colors and hotspots or any artwork they wish, then convert to 32-bit and use as an HDRI. That is the cheapest solution for those unwilling or unable to buy commercially available panos or the excellent HDRI's that Jan's company has available.

Posted: Wed Aug 09, 2006 5:59 pm
by glypticmax
Hi Jake,
Very interesting.
Is there an advantage to using CS2 to create an HDR image, over opening the jpg in Maxwell's Viewer and saving as an MXI file?
I've done this and it seems to work very well.
I wasn't familiar with making an HDR in CS2, and the bit I just read seems to suggest the only way is to merge different exposures of the same image.
When I opened some random jpgs, converting them to 32 bit was greyed out. So that simple process wasn't an option.

Posted: Wed Aug 09, 2006 6:09 pm
by Jake256
glypticmax wrote:Hi Jake,
Very interesting.
Is there an advantage to using CS2 to create an HDR image, over opening the jpg in Maxwell's Viewer and saving as an MXI file?
I've done this and it seems to work very well.
I wasn't familiar with making an HDR in CS2, and the bit I just read seems to suggest the only way is to merge different exposures of the same image.
When I opened some random jpgs, converting them to 32 bit was greyed out. So that simple process wasn't an option.
The advantage is if you need to edit them. I guess the main thrust is that if you were unable to spend the money then you could conceivably create your own montage of elements, then export as a radiance file. You could use the MXI technique as well. This technique is good for other software where making an MXI is not an option, but using an HDRI is possible. Plus, I think it's a little faster than making an MXI.

You have to convert to 16-bit first, then 32-bit.

Posted: Wed Aug 09, 2006 6:20 pm
by SJ
Hi Jake,

I read your suggestion about 1000skies. Thanks for that! Unfortunately I don't own CS2 at the moment. I'm still working with CS1... have seen no reason to upgrade by now. Maybe I've got one now ;)
The third image with harsh shadows looks very convincing.
So you simply converted an 8-bit jpg to 32-bit HDR and achieved these results without tweaking tonal curves or anything?
How does PS know what's the REAL brightness value of the burnt-out sun in the .jpg compared to the blue sky? :shock:

Stefan

Posted: Wed Aug 09, 2006 6:32 pm
by Hervé
they look very nice Jake, I bow... special mention for the last and first render... really a great job... you're Da man when it comes to hdri... cool.. :wink:

(+ eraserhead is one of my all time favorite Lynch...)

Posted: Wed Aug 09, 2006 6:36 pm
by glypticmax
[quote="

You have to convert to 16-bit first, then 32-bit.[/quote]

Hi Jake,
Thanks for the tip.
I get your point about speed and editability.
Cool.

Posted: Wed Aug 09, 2006 7:17 pm
by Jake256
SJ wrote:How does PS know what's the REAL brightness value of the burnt-out sun in the .jpg compared to the blue sky? :shock:

Stefan
Well, it's kinda guesswork. Make adjustments using the gamma and exposure settings then run a render. You develop and ey for what will work and waht will not.

The best way is to shoot panos as a series of RAW files and open each image 8 times one for highlights, one for shadows and the rest for a range inbetween. Blend these in photoshop. Then you will need to stitch these images into a seamless pano using RealViz Stitcher or similar product. This is gives a better HDRI, but is unbelievably time-consuming.

Fudging the values with PhotoshopCS2 will give acceptable results for all but the most demanding artists. I'm not that good at 3d so the technique is good enough for my level.

Just throwing another option out there for others interested making their own HDRIs. :)

Here are a couple animation tests using full-360 HDRIs. Al illumination and reflection comes from the HDRIs. Best way to light an animation. I converted these to mpeg4 so I hope they are viewable.


http://www.designorg.com/cheetah3D/broadHighH2642.mov

http://www.designorg.com/cheetah3D/feBroadHigh2.mov


And that's half eraserhead, and half me. Hideous . . . I know.

Posted: Wed Aug 09, 2006 9:30 pm
by x_site
Nice one Jake...

for those who are a bit slower understanding this stuff can you please tell us if you know of any good sites with tutorials online?

Many thanks

Posted: Wed Aug 09, 2006 10:04 pm
by Jake256
Paul Debevec's site is a real good source of information. Check out the Campanile movie. Excellent!
http://www.debevec.org/


Good software for you windows folks.
http://gl.ict.usc.edu/HDRShop/


Another explanation of HDRI
http://www.luminous-landscape.com/tutorials/hdr.shtml


More
http://www.earthboundlight.com/phototip ... 32bit.html


This is a good tut on making an HDRI probes with a chrome ball. Tough. . . I've tried it
http://www.andrew-whitehurst.net/hdri_tut.html

Posted: Thu Aug 10, 2006 8:40 pm
by kirkt
For those Mac Users interested in rolling their own HDR images, there is an excellent app called "Photosphere" written by Greg Ward, author of the Radiance (.hdr) file format:

http://www.anyhere.com/

This is a Mac only app - it includes a nifty feature that permits you to make HDR panoramas from mulitple HDR images:

Image

is an example.

It does not transform mirror ball images to angular maps, lat-long maps, etc.

You can also use this nifty web-based tool:

http://luminance.londonmet.ac.uk/webhdr ... -own.shtml

A nice PShop plug-in that does a lot of image tranformation on HDR images is Flexify:

http://www.flamingpear.com/flexify.html

Of course you need PShop CS2 to support HDRs.

Making your own HDR angular maps or lat-long maps from a mirror ball is pretty straightforward - just experiment with it. The general process involves shooting multiple low dynamic range exposures (normal 8 bit images) of the same scene and then mathematically combining those exposures to extend the dynamic range of the image beyond the 8 bit range of the sensor in the camera. Some pointers:

1) use a tripod for the camera and a stable support for the mirror ball so the mirror ball image stays registered within the image frame across all exposures. It is also worthwhile to take each image by setting the timer on the camera to release the shutter, minimizing camera shake.

2) shoot with a longer lens at about f/8 - zoom in so the mirror ball fills the image field. The fixed aperature will keep the DoF constant, bringing the ball into sharp focus and blurring the background behind of the mirror ball. Also, getting farther away from the mirror ball and zooming in removes wide angle lens parallax and minimizes the size of the reflection of the camera in the mirror ball. I use a 2.5 inch diameter chrome ball bearing and shoot at 300mm with a zoom lens.

3) Set the white balance of the camera manually - that is, disable AUTO white balance. You do not want the white balance to change across exposures.

4) shoot in 8 bit mode (NOT RAW or the equivalent). The use of 12 or 16 bit RAW does not gain you anything, since you will be extending the range of the LDR image by combining them anyway. Shooting 8 bit JPEG will generate all of the necessary EXIF data required by Photosphere, for example, to determine automatically the exposure of each image and its relation to the other images. In HDRShop you will have to set the exposure interval manually or give it guidance on a guess - I use the free version 1 of HDRShop ...maybe the HDRShop2 release automatically reads EXIF data? The nice thing about HDRShop is that it permits you to transform your mirror ball images into Angular Map and Lat-Long - it also allows you to combine two mirror ball images taken 90 degrees apart so you can remove the reflection of the camera in the image.

5) Exposure changes are made in Aperture Priority mode (fixed aperture at about f/8 ) and manually changing the shutter speed. You can also automatically change the shutter speed in Av mode if your camera has Auto-Bracketing mode. I usually fix the aperture at f/8 and then shoot in steps of 1EV by using standard shutter speeds (say, 1/15, 1/30, 1/60, 1/125, 1/250, 1/500, etc.)

6) Your exposure range should include the darkest shadows and hottest highlights. This may be 3 images or 7 images, depending upon the lighting conditions and the interval your choose as an increment for your exposure. I usually shoot in 1EV increments and find that this is sufficient.

7) When shooting outdoor or changing lighting conditiions, be aware that this will affect your HDR because the process assumes that the lighting in the actual scene is not changing in between exposures.

8 ) Have fun!

kirk


EDIT: You can use all of these techniques for standard photographic images as well, paying careful attention to the tone-mapping used to generate your final 8-bit image fom the high-bit HDR!

Posted: Thu Aug 10, 2006 8:44 pm
by Maximus3D
Holy moly.. :shock: teh info. Wow thanks Kirk & all.

Here's one panorama app that supports hdri, i never tried this one but it looks good.

http://www.autopano.net/

/ Max

Posted: Fri Aug 11, 2006 7:16 am
by Hervé
Great find Max... I really did not know that app.... looks cool..

Posted: Fri Aug 11, 2006 4:10 pm
by Micha
Interesting software Maximus. Thanks for the link.

Here my experience with HDRI selfcreation (copy of my post at the Vray for Rhino forum some months befor):

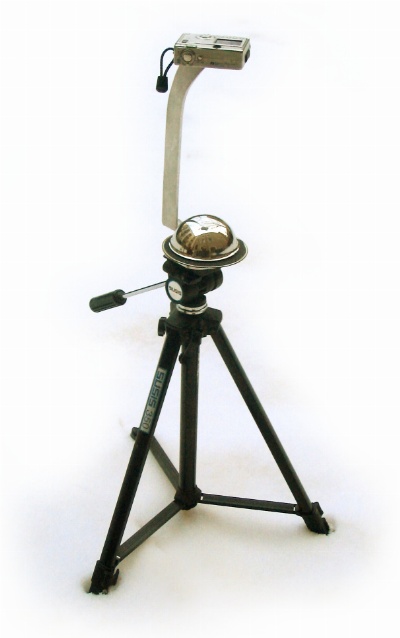
First, I don't use a chrome sphere, I use a big soup ladle from Rösle (www.roesle.de). This soup ladle are approx. a half sphere - price approx. 20,-euro for 10 cm diameter. Most you will find this kinf of ladle in design kitchen stores.

Very often I have seen that people shot photos in horizontal direction, but than a part of the horizon is missed. My new technic is to shot the image with the camera top down. So, only a part of the ground is missing, but most this can be easy retouched. For reflection/GI environments this small artefact at the ground is no problem.
My english is not the best, here an image of my tool as discription:
Image
A small 2 MegaPixel Canon Ixus v² help me to shot the images. And here a LDR version of a retouched and tonemapped panorama shot:
Image

Ok, the image show some distortions, but for lighting it is no problem and in reflection is will not be visible most. For high res backgrounds I use extra shots from the place. If the background is blury, than an additional high res image is not needed. Here an old example with full usage of a selfmade HDRI.

Regards
Micha

Image

Posted: Fri Aug 11, 2006 10:32 pm
by glypticmax
Hi Micha,
That is quite the cool set up for HDRI.
The *real question* is......how good is the soup you make with that ladel?
Thanks for posting that. I'll have to find a way to work in some duct tape and staples to keep it up to my contruction standards, but I think I can manage it.

Posted: Wed Nov 01, 2006 3:30 am
by Xlars
Thank you all for these great links and ideas. He he .. Micha, that is a good idea to shoot from that direction. I have to try your method once I get hold of such a reflecting object.

Question: In the simple case that I just want to convert a wide format panorama image to HDRI (the image is a nomal photo with some sky and some ground in it). What do I need to do to convert this into a usable HDRI, lighting my scene with a dome of imagebased lighting? (I know about opening the file and saving as a .mxi in Maxwell Render, but what do I need to do to the image to make it correct spherical HDRI?

Thanks