Page 1 of 1
Increase Mesh.....
Posted: Fri Aug 22, 2008 6:11 pm
by caryjames
Hi again, I am having a bit of an issue in rendering a ring at a high resolution. The top of the ring has a circular brushed finish- the finish is being impacted by the mesh of my object.
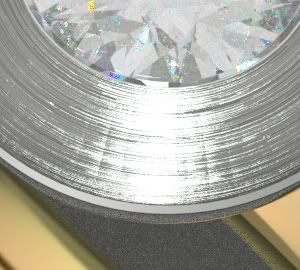
Since this render I have increased the mesh to the maximum size using the slider in the object properties tab but am still having the problem albeit finer and less pronounced
I am rendering out a scene right now or I would include the current image but essentially I am having the same issue but on a more fine scale. I have also reduced the bump which helped a little.
Is there any other way to increase the mesh past the tab in the object properties window?
The bezel was created using a simple revolved ellipse so it doesn't have non-tangential curves or anything like that.
Posted: Fri Aug 22, 2008 6:26 pm
by JDHill
Is there displacement in that material?
Posted: Fri Aug 22, 2008 6:52 pm
by caryjames
Hi JD- There is no displacement, here are screenshots of my material


Posted: Fri Aug 22, 2008 8:23 pm
by JDHill
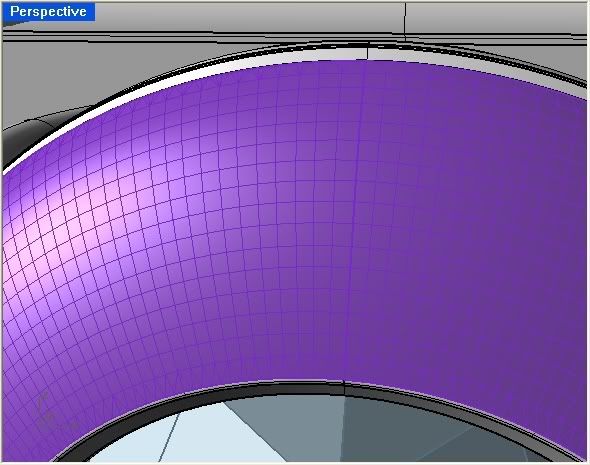
I guess this is a bump-mapping problem under these particular lighting conditions. You could make the mesh super-dense using custom settings (not using the simple adjustment slider interface), or you can modify the material. As far as changing the material goes, try this:
- disable both bump maps
- re-mesh the surface to where it has around 20 rows of quads (from the center edge to the outer edges) when you click 'Preview' in the custom mesh dialog
- add a displacement layer using the same map; change height to 0.05 and precision to around 16-24
Posted: Fri Aug 22, 2008 9:18 pm
by caryjames
Hi JD- O.K. Don't kill me yet

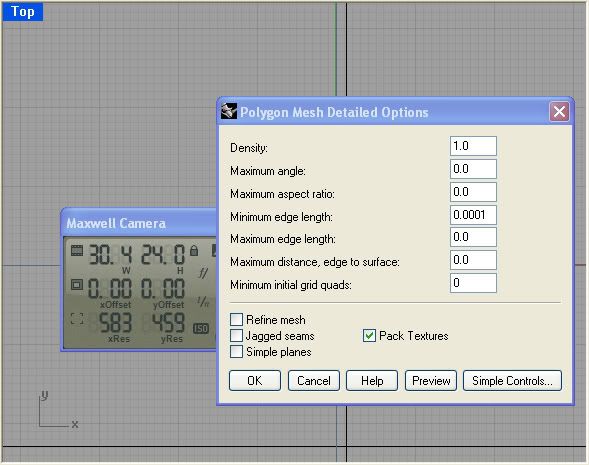
. How do I re-mesh the surface? I tried increasing the Density but it always resets back to 1.0. I checked refine mesh but it only remeshed part of the surface. Here are a couple of screen shots.
I know you are probably tired of hearing this but.... thanks
Posted: Fri Aug 22, 2008 9:40 pm
by JDHill
That mesh is pretty close already but you can get rid of some of those tall/skinny triangles at the inner & outer edges (displacement works best when you can get the mesh close to having only quads). Easiest way would be clicking 'Simple Controls...' in the dialog you posted a screenshot of, adjusting the slider, clicking 'Preview' - do that a few times and you'll find what you're looking for.
Posted: Fri Aug 22, 2008 9:52 pm
by caryjames
Thanks JD- I made it into simple planes and it did become more "simple".... is there any way of increasing the density more than what I have shown? I tried to adjust the density value but it kept reverting to 1.0. I have to head out of town for the weekend but I will do the other changes you suggested and then re render next week. Thanks for your time!
Posted: Fri Aug 22, 2008 10:22 pm
by JDHill
You might have just missed it - I didn't mean the 'Simple Planes' checkbox, I was referring to the 'Simple Controls...' button at the bottom-right of the dialog - that'll give you a simple slider to work with, but there's a limit to how dense of a mesh it will create. As to using the manual controls, you could pretty much bring your machine to its' knees by checking Refine Mesh and setting Maximum edge length to something like 0.02-0.01...
Posted: Fri Aug 22, 2008 10:48 pm
by caryjames
Thanks JD! Until I upgrade from XP32 to XP64 I will stay away from the fine Refine Mesh command
!